Thank you for making WooDelivery as a part of your business planning. In this article you will find some helpful information and useful links that you need during initial setup and basic operations.
1. Organization Structure
Here is the structure of your WooDelivery organization and entities:
Tasks
A task is the core unit of work to be completed by drivers or agents using the driver app. For example:
- Delivery of parcel
- Pickup of groceries
- House cleaning service
Teams
You could create different teams using WooDelivery and classify drivers based on parameters like location, zones, distance, etc. Teams group drivers and dispatchers together and are used to segment an organization by geographic area or operational unit.
Administrators
Administrators have the full access permission to the system. They can configure the organization, manage teams, dispatchers, and drivers. They can also create API keys for integration.
Dispatchers/Managers
Dispatchers can be any user created by admin with restricted permissions. A dispatcher is a dashboard user who views and manages drivers and tasks for the assigned teams.
Drivers
Drivers are the delivery agents who will be doing the pickup and delivery from one location to another. Drivers can be any user created by admin or dispatchers with restricted permissions.
Merchant
Merchant is a seller or a service provider on a marketplace. Admin users can manage on-demand delivery requests for multiple merchants under the same umbrella. The merchant has access only to his dashboard where he can manage his tasks, contacts and other functionalities for the store. You can also create merchant accounts for your regular customers.
Contacts
Contact is the recipient or requester in a delivery or pickup task. You can upload your contact list to WooDelivery dashboard.
Map Hubs
You can create custom locations and places on the map that are visible to your dispatchers and drivers. e.g. headquarters, warehouse, central kitchen. You can also set up different icon, title, description for each hub.
2. Organization Settings
Once your account is created, please log into the Admin Dashboard to manage your organization, teams, dispatchers, merchants and drivers.
From the Setting > Account page you can configure your organization’s essential settings. All the fields are required.
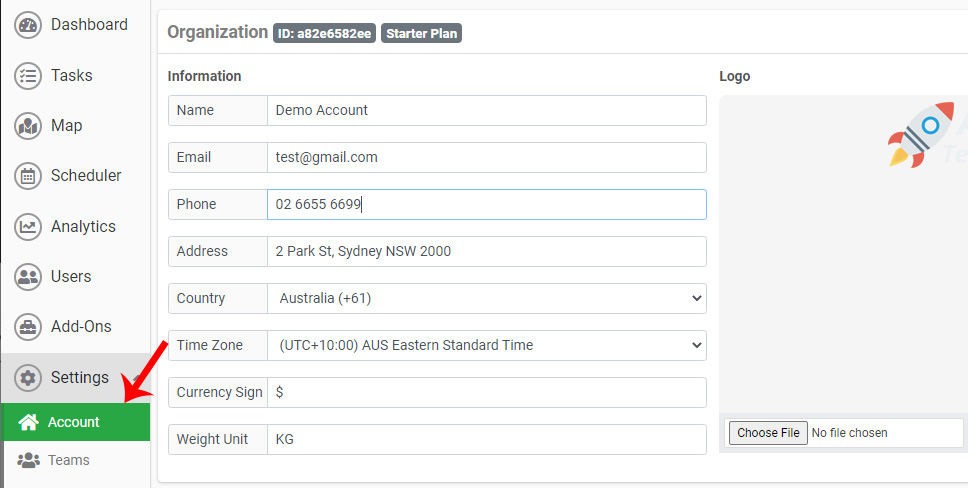
Upload Logo: Click on the Choose File button to upload an organization logo. File format must be either JPEG or PNG, and the size must be smaller than 5MB.
3. Manage Dispatcher & Driver
In this section, you will learn how to add a dispatcher and driver to your WooDelivery organization. You need to log into the admin dashboard with your administrator account.
Create Dispatcher
- Open “Users” page on the navigation menu on the left-hand side.
- Click on “Add User” button on the top-right corner.
- Enter the user details and set up a temporary password.
- Choose a team for the dispatcher (optional).
- Tick on the “Dispatcher” on the user role list.
- Configure the dashboard access permission for the dispatcher.
- Click on the save button to create the user and send a welcome email with login details to the new dispatcher.

Delete Dispatcher
- Open “Users” page on the navigation menu on the left-hand side.
- Select a dispatcher and click on the “Edit” icon on the right-hand side.
- When the user modal shows, click on the “Delete User” button at the bottom.
Create Driver
- Open “Users” page on the navigation menu on the left-hand side.
- Click on “Add User” button on the top-right corner.
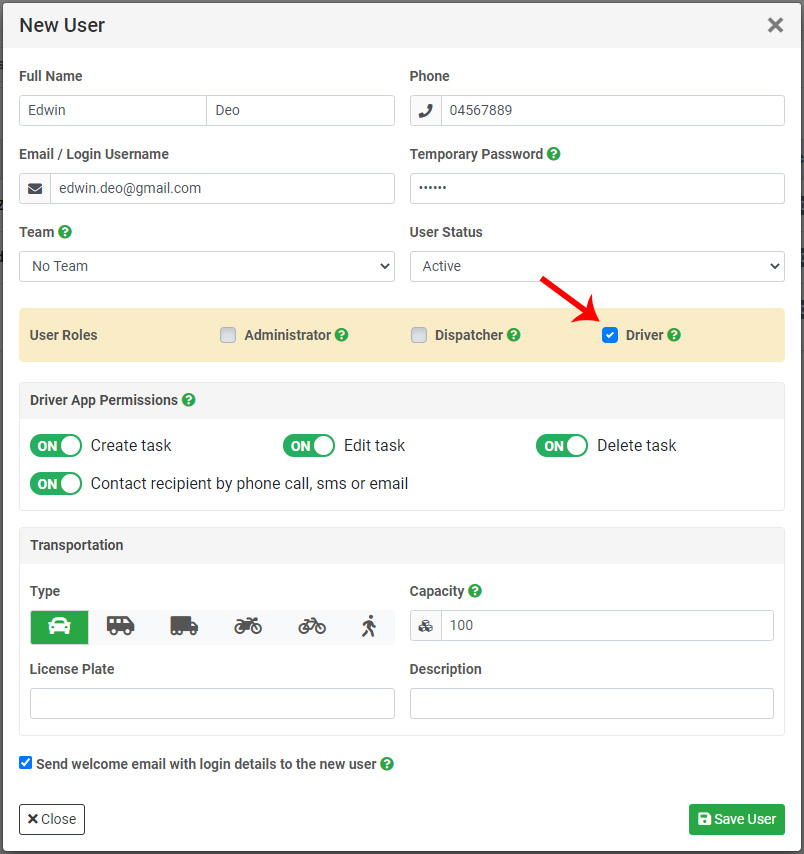
- Enter the user details and set up a temporary password.
- Choose a team for the driver (optional).
- Tick on the “Driver” on the user role list.
- Configure the driver app access permissions.
- Enter the transportation and capacity details.
- Click on the save button to create the user and send a welcome email with login details to the new driver.
Delete Driver
- Open “Users” page on the navigation menu on the left-hand side.
- Select a driver and click on the “Edit” icon on the right-hand side.
- When the user modal shows, click on the “Delete User” button at the bottom.
4. Task Overview
To manage your tasks, you need to log into the admin dashboard with your administrator or dispatcher account.
A task is the core unit of work to be completed by drivers or agents using the driver app. For example:
- Delivery of parcel
- Pickup of groceries
- House cleaning service
Task Status in WooDelivery platform are displayed throughout the dashboard using simple symbols and colors. Here are the details about tasks
- Unassigned: The task has not been assigned to any driver and will be reflected in grey color. All new tasks created on the system will be on Unassgiend status.
- Assigned: The task has been assigned to an driver and will be reflected in blue color.
- In Transit: The task has been started and the driver is on the way and this will be reflected in orange color.
- Completed: Task has been completed successfully. Succeeded tasks will appear as a green color.
- Failed: Task has been completed unsuccessfully. Failed tasks will appear as a red color.
5. Manage Tasks (Table View)
Table View is a structured view and organization of all the tasks on your account. Tasks are presented as rows in a flexible table format that features sorting, filtering, grouping and bulk actions. To manage your task in a table view, please log into dashboard an navigate to the Tasks page.
Filter & Find Task
You can use the “Search” bar on the top of grid to find tasks or recipients by searching text found in any field on any task within your dashboard. Only tasks with a field that matches the text entered, and to view all tasks again, simply delete the text in your Search box.

Columns
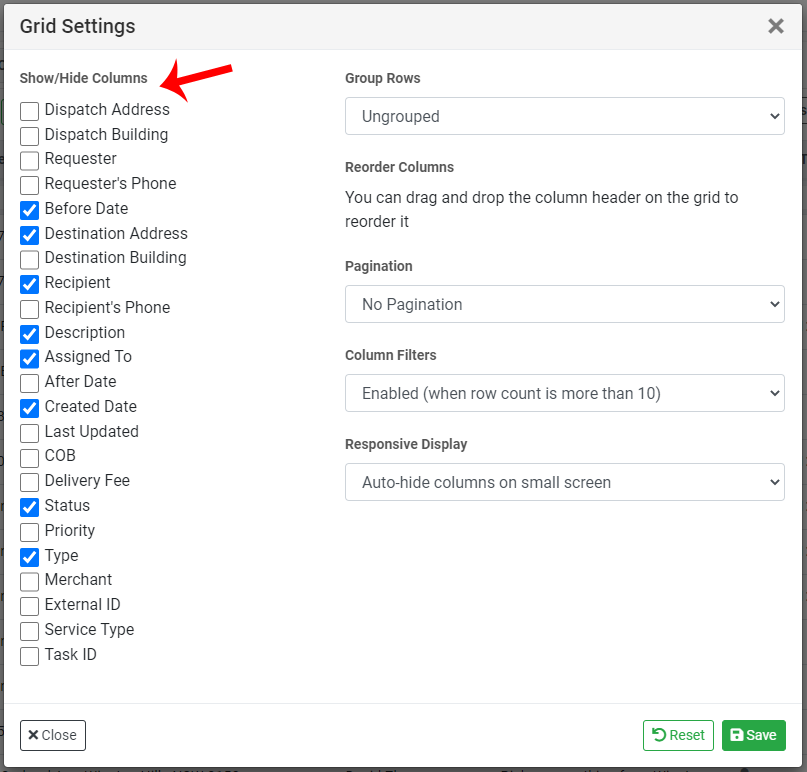
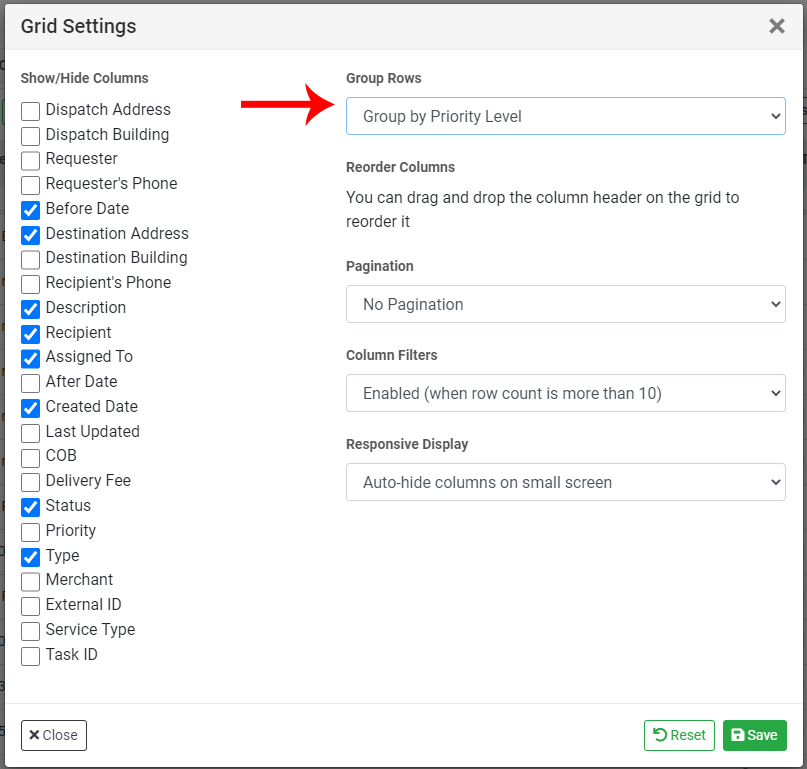
Add/remove columns: To show & hide columns, click on the Grid Setting icon on the top of the page, then tick on the columns that you want to show them on the grid.

Moving columns: You can change the column order in the Table view by clicking on the column header and dragging it into a new position. Once you have set the order for your columns, it will be saved for future dashboard sessions.

Sort tasks by column: To sort tasks by a specific column, click anywhere on the column header and release. All tasks are sorted according to the data type for that column, alphabetical, or chronological. You can hold the “Shift” key and click the column header to sort rows by multiple columns together.

Group rows by column: click on the Grid Setting icon, then select a column from dropdown for row grouping.
Edit/View Task
Click on the Edit icon on the right-hand side to view or edit a task.
Bulk task actions
This allows the dispatchers to easily perform batch actions on multiple tasks selected on the grid. After selecting at least one task on the grid, click on the bulk action buttons on the top of the grid.
Click on the “Assign Driver” icon to assign selected tasks to driver.
Click on the “Delete” icon to delete the selected tasks.
Click on the “Edit” icon to update the bulk tasks.
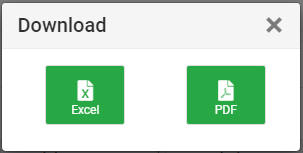
Download Tasks
Click on the download icon on the top of the grid to download the task list on PDF or Excel formatted documents.
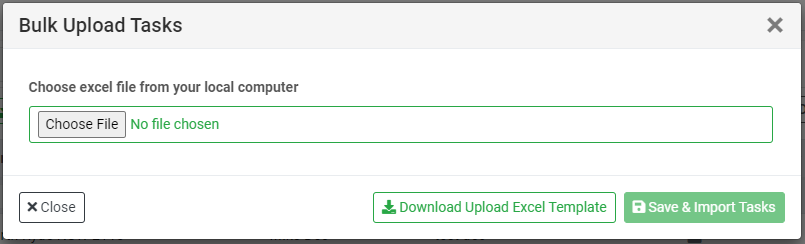
Upload Tasks
To bulk upload tasks, click on the Upload button and download the “Excel Template”. Filled the spreadsheet with the required details and click on the “Choose File” button to upload it from your local computer.
6. Task Assignment
In this section you will learn how to manually assign tasks to drivers for completion. Please note that tasks can also be assigned to your drivers using the auto-assignment, self-assignment and route optimization addons.
To manually assign tasks in a table view, please log into dashboard an navigate to the Tasks page.
Click on the user plus icon on the table to assign a single task. Alternatively, you can click on the checkboxes to select multiple tasks, and click on the Assign button at the top of the table.
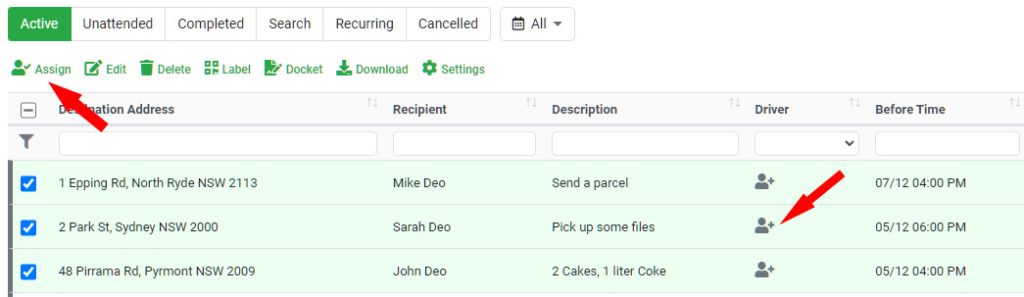
Then choose a driver on popup and click on the [Notify] or [Assign] button:
- Notity: The selected driver is alerted of the new task on his driver app. All pending tasks are displayed on the waiting tasks screen and driver has the option to accept or reject it. If driver do not reponse the request in a certain time, the task will be changed back to [Unassigned] status.
- Assign: Force-assign tasks to a driver who is required to complete the job.
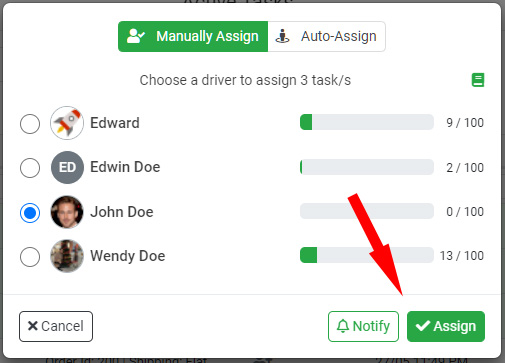
Drivers will receive push notification on their driver app once tasks are assigned to them.
7. Automated Notifications
The automated notifications module allows an admin to set up and customize any number of automated Email or SMS messages that can be sent to a recipient or requester based on varying driver actions and triggers. It completely automates the communication process by sending customized notifications in the form of Email and SMS, to the customers associated with each task.
To set up automated notifications, please navigate to Settings>Notification page:
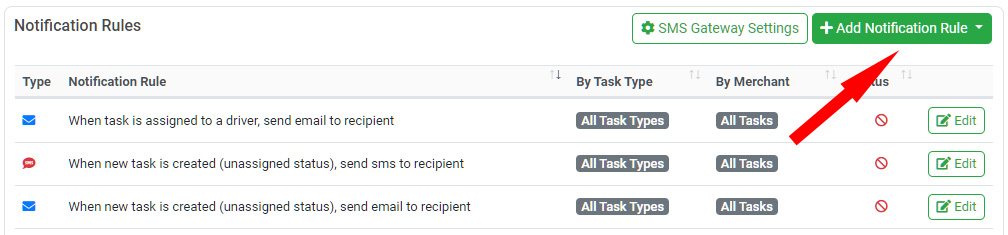
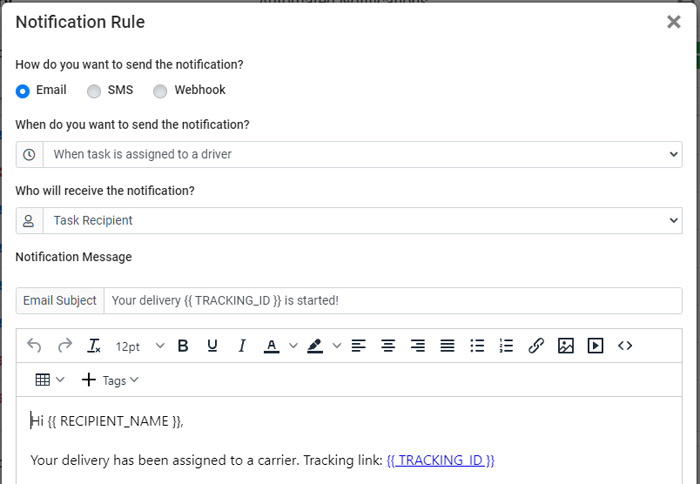
Please click on the [Add Notification Rule] button at the top-right corner of the page. Choose a message type and a trigger and you will see a message template on the page. The exact messaging of these notifications can be completely customized along with task-specific tags. Tags are variables that are replaced with text at the time the notification is sent. You can add new tag to your message body by clicking on the [plus] button on the right side of the toolbar.
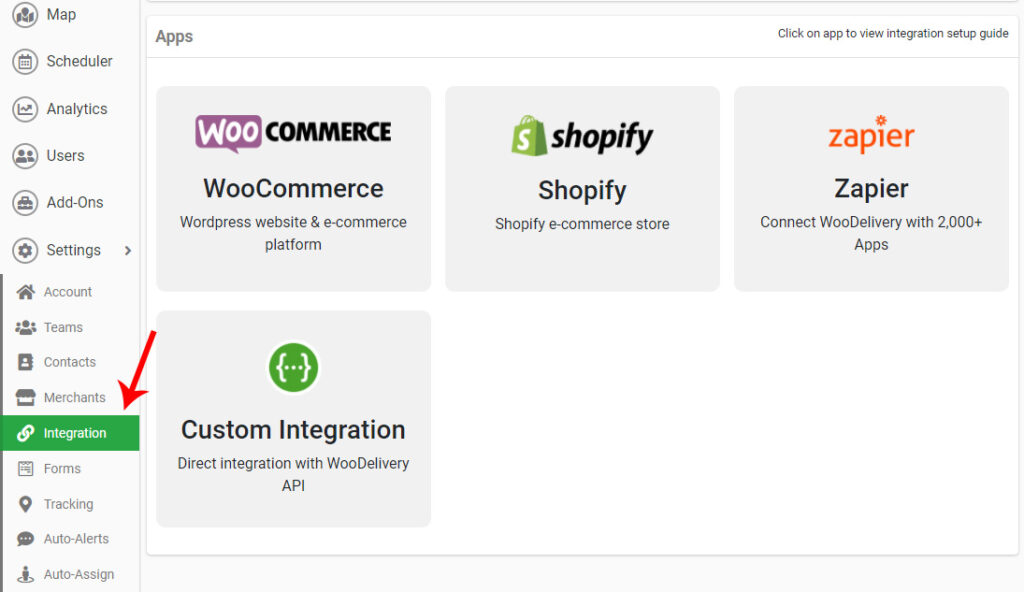
8. Integration & API
You can learn about WooDelivery’s integration options and get API keys from the Settings>Integration page.
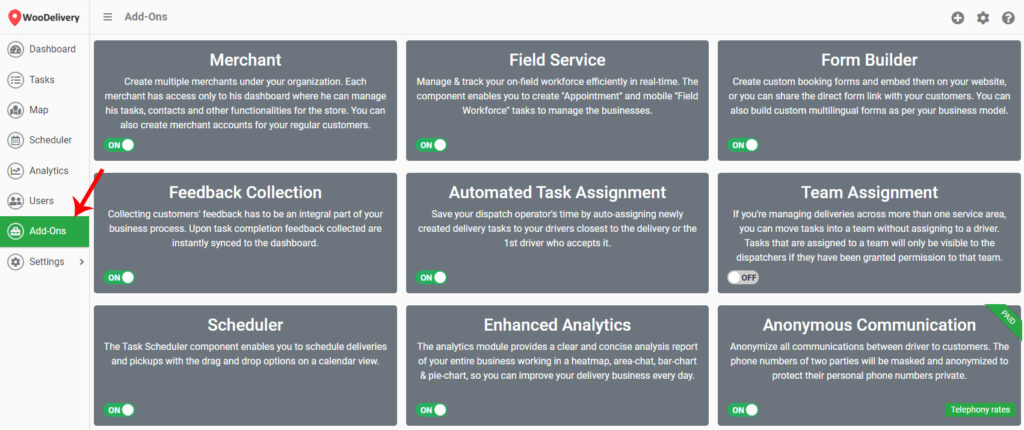
9. Add-ons
Add-ons make it possible to customize WooDelivery for your business. Popular Add-ons: Route Optimization, Custom Booking Form, Feedback Collection, Click & Collect, Driver Earnings, Driver Schedule, Anonymous Communication, Automated Task Assignment, Recurring Tasks, Delivery Docket and more.
Administrators can activate the add-ons and extensions on the admin dashboard Add-Ons page.