Jungleworks Yelo is a powerful digital ordering platform for businesses at every scale, helping local entrepreneurs with a complete tech suite to run and automate their multi-vendor marketplace business. To get started with your integration between Yelo and WooDelivery, follow the 5 minutes step-by-step guide below.
1. Generate your WooDelivery API Key
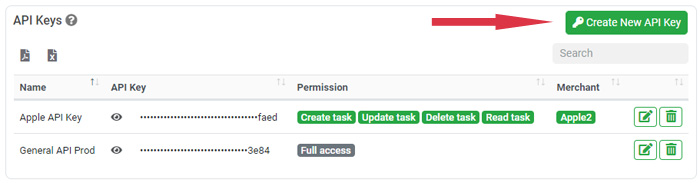
- Navigate to the Settings/Integrations page within WooDelivery Admin Dashboard
- Click on [Create New API Key] button to generate a API key and copy it for later use.
- Note: this API key is the [Auth Token] on Yelo platform.
2. Configure custom DMS on Yelo
- Go to Yelo admin dashboard
- Choose the [Integration] – [Configure DMS] from the menu
- Click [Add] button to create a new Custom DMS Integration

3. Configure the new Custom DMS integration endpoint
Create an custom integration endpoint with the following details:
- DMS NAME: WooDelivery
- SUPPORT EMAIL: Your dispatcher team email address
- URL: https://api.woodelivery.com/api/yelo/order?apikey=[YOUR-API-KEY]
- AUTH TOKEN: [YOUR-API-KEY]
- Note: Kindly replace [YOUR-API-KEY] with the actual API key you generated from the WooDelivery admin dashboard.
- Click Add or Update button to save your endpoint

4. Testing
Once the integration endpoint is created, you can create a test order on Yelo platform. Upon accepting the newly created order through the Yelo admin dashboard, it should seamlessly trigger the automatic generation of a delivery task on the WooDelivery platform, complete with all the pertinent order details.
Optional Settings:
If you wish to enable automatic order status updates from WooDelivery to Yelo, please proceed with configuring the webhook on WooDelivery. The webhook serves as the mechanism for initiating automated order status updates. For instance, when a driver completes a delivery task using the driver app, it can seamlessly update the status of the corresponding Yelo order to completed. To configure the callback webhook, please follow to the instructions below:
5. Create an API Key on Yelo
- Go to Yelo admin dashboard
- Choose the [Account] – [Settings] from the menu and go to [Keys] tab
- Click [Generate] button to create a new API Key for later use

- Choose the [Account] – [Settings] from the menu and go to [Account] tab
- Copy and save your Yelo user ID from the [Account Details] section for future use
6. Create webhook on WooDelivery
- Navigate to the Settings/Notifications page within WooDelivery Admin Dashboard
- Click [Add Notificaiton Rule] and choose the [Webhook Post] from the menu

6. Configure webhook to mark Yelo order as dispatched
We will set up two webhooks. The first webhook will be used to automatically update the status of Yelo orders to “Dispatched” when a delivery task is assigned to a driver on WooDelivery. Please create a new webhook notificaiton using the following details:
- When do you want to send the notification?: When task is assigned to a driver
- Method: POST
- Webhook URL: https://api.yelo.red/delivery-integration/callback
- Payload Data: Custom JSON Data
- Apply by Task Creation Source: Yelo Integration Orders
Kindly copy the following data and paste it into your webhook payload and save it:
{
"api_key": "[YOUR_YELO_API_KEY]",
"user_id": "[YOUR_YELO_USER_ID]",
"marketplace_user_id": "[YOUR_YELO_MARKETPLACE_USER_ID]",
"order_id": "{{ EXTERNAL_KEY }}",
"status": "12",
"tracking_link":"{{ TRACKING_LINK }}"
}
NOTE: Please replace [YOUR_YELO_API_KEY] with the actual API key you generated on the Yelo platform. Additionally, replace [YOUR_YELO_USER_ID] with your authentic Yelo user ID, and replace [YOUR_YELO_MARKETPLACE_USER_ID] with your authentic Yelo marketplace user ID.

7. Configure webhook to mark Yelo order as delivered
The second webhook will be used to automatically update the status of Yelo orders to “Completed” when a delivery task is completed by a driver on WooDelivery. Please create a new webhook notificaiton using the following details:
- When do you want to send the notification?: When task completed successfully
- Method: POST
- Webhook URL: https://api.yelo.red/delivery-integration/callback
- Payload Data: Custom JSON Data
- Apply by Task Creation Source: Yelo Integration Orders
Kindly copy the following data and paste it into your webhook payload and save it:
{
"api_key": "[YOUR_YELO_API_KEY]",
"user_id": "[YOUR_YELO_USER_ID]",
"marketplace_user_id": "[YOUR_YELO_MARKETPLACE_USER_ID]",
"order_id": "{{ EXTERNAL_KEY }}",
"status": "13",
"tracking_link":"{{ TRACKING_LINK }}"
}
NOTE: Please replace [YOUR_YELO_API_KEY] with the actual API key you generated on the Yelo platform. Additionally, replace [YOUR_YELO_USER_ID] with your authentic Yelo user ID, and replace [YOUR_YELO_MARKETPLACE_USER_ID] with your authentic Yelo marketplace user ID.

All Done!